45 Easy Nail Art Designs for Every Style and Occasion
Explore Nail Art That is Easy For Everyone: From Minimalist to Glamorous
Nail art has become a vibrant form of self-expression, allowing people to showcase their creativity and style right at their fingertips. From minimalist designs to intricate patterns, the world of nail art offers endless possibilities for every occasion and personal preference. These 45 easy nail art designs cater to all your nails and skill levels, providing inspiration for beginners and seasoned nail artists alike.
Whether you're after a subtle and sophisticated look for the office or a bold statement for a night out, this collection has something for everyone. These easy nail designs range from classic manicures with a twist to trendy abstract designs, ensuring there's a perfect match for any outfit or event. With simple nail designs and readily available tools like a nail art brush or striping brush, these easy nail art ideas are accessible to anyone keen to elevate their mani game.
45 Easy Nail Art Ideas For Every Occasion
- Classic French Manicure
- Glitter Ombré
- Minimalist Geometric Patterns
- Floral Nail Art
- Marble Effect
- Negative Space Designs
- Holographic Nails
- Polka Dot Perfection
- Ombré Nails
- Striping Tape Art
- Galaxy Nails
- Watercolor Effect
- Animal Print
- Metallic Accents
- Pastel Swirls
- Neon Brights
- Matte Finish
- Splatter Paint
- Chevron Patterns
- Lace-Inspired Designs
- Glitter Placement
- Fruit-Inspired Art
- Gradient Dots
- Stained Glass Effect
- Retro Patterns
- Marble Swirls
- Pressed Flower Nails
- Iridescent Finish
- Reverse French Tip
- Striped Ombré
- Confetti Nails
- Minimalist Line Art
- Foil Accents
- Stamping Art
- Textured Polish
- Tie-Dye Inspired
- Mosaic Effect
- Velvet Nails
- Distressed Denim
- Crystal Geode
- Sunset Gradient
- Boho Patterns
- Shattered Glass
- Neon Signs
- Seasonal Nail Art
1. Classic French Manicure

The classic French manicure remains a timeless nail art choice. This elegant and super easy nail art idea features white tips applied to a light pink or clear base colour, creating a sophisticated look. French manicures have enjoyed a recent resurgence in popularity, with their versatility making them suitable for both casual and formal occasions.
To achieve this look at home:
- Apply a base color
- Paint nails with a sheer pink polish
- Use white polish or nail strips for the tips
- Finish with a top coat
For best results, opt for high-quality products and take your time with an application. Clean lines are crucial for a polished appearance. While the classic white-and-pink combination remains popular, modern variations incorporate different colours and designs, allowing for personal expression while maintaining the French manicure's refined essence.
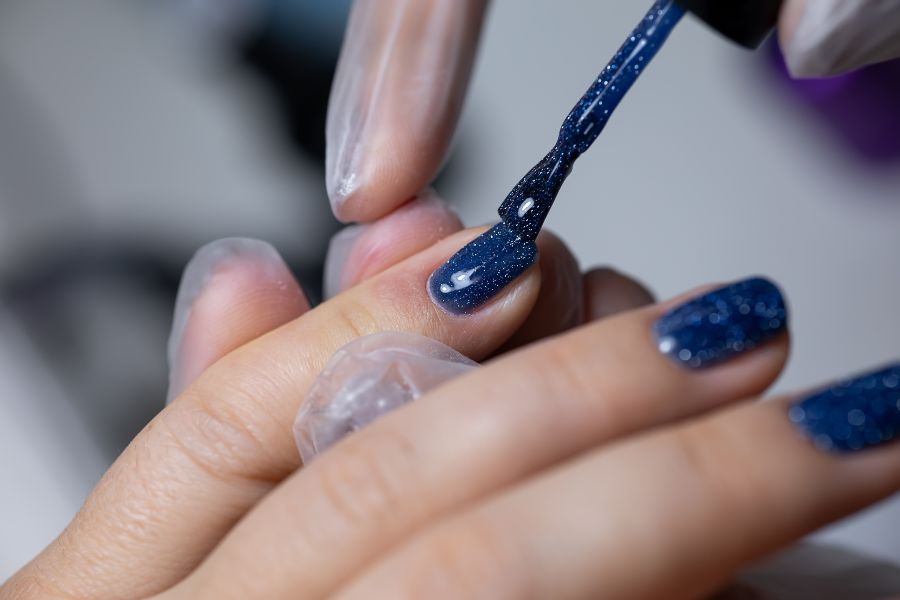
2. Glitter Ombré

Glitter ombré nails offer a stunning blend of glamour and sophistication. This eye-catching style combines a gradual colour transition with sparkling glitter for a dazzling effect. To create a glitter ombré look, start with a solid base colour and choose a complementary glitter shade that will seamlessly blend into the base.
Apply the base colour to the entire nail. Then, using a sponge or detailer brush, gently dab the glitter polish onto the tips, fading it towards the middle of the nail. For a subtle approach, opt for a neutral base with fine shimmer. Bold combinations like red and gold glitter make a striking statement, perfect for special events or nights out.
Experiment with different sizes and colours of glitter, mixing fine and chunky glitters for added dimension and visual interest. Almond-shaped nails work particularly well with glitter ombré designs, as the elongated shape enhances the gradient effect.
3. Minimalist Geometric Patterns

Simple shapes create stunning results in minimalist nail art. Geometric designs offer a sleek, modern look that's perfect for any occasion. To create basic geometric patterns, use thin strips of tape or fine brushes. Start with straight lines, triangles, or squares for an eye-catching effect.
Colour combinations play a key role in geometric nail art. Try these options:
- Black polish and white for a classic monochrome look
- Pastel pink and grey for a soft, feminine touch
- Navy and gold for elegant evening styles
Apply a base colour in a neutral shade like nude or pale pink. Once dry, place tape on the nail to form your desired shape. Paint over the exposed area with your chosen colour. For more intricate designs, use a thin brush to draw freehand lines or shapes.
Popular geometric patterns include chevrons, criss-cross lines, half-moon shapes, and negative space triangles. Remember to seal your design with one coat for longevity and a second coat for added shine.
4. Floral Nail Art

Floral nail art brings a touch of nature's beauty to fingertips. This versatile style suits various occasions and seasons, offering endless possibilities for creativity. Simple nail designs like daisy patterns are perfect for beginners, while more elaborate rose patterns can create romantic looks.
Popular Floral Nail Art Styles:
- Minimalist single-stem flowers
- All-over floral patterns
- Accent nail bouquets
- Negative space blooms
Advanced techniques include 3D flowers using acrylic or gel, adding texture and dimension to manicures. For those short on time or artistic skill, floral nail stickers and decals offer quick alternatives for instant botanical beauty.
5. Marble Effect With Nail Stickers

Marble nails are a sophisticated and eye-catching design that mimics the elegant swirls of natural stone. This versatile technique can be adapted to suit any colour palette or occasion. To create a marble effect, start with a base coat in a light shade like white or pale grey.
Choose two or three complementary colours for the marbling. Popular options include:
- Black polish and white for a classic manicure look
- Blue and turquoise for an oceanic vibe
- Pink and gold for a touch of glamour
Apply small drops of polish to a cup of room-temperature water. Use a toothpick to swirl the colours together, creating a marbled pattern on the water's surface. Gently dip your nail into the pattern, allowing it to transfer onto the nail. Clean up any excess polish on the skin with acetone.
For a quicker alternative, try the dry brush technique or use nail stickers designed to mimic marble patterns. Remember to finish your marble manicure with a glossy top coat to enhance the stone-like appearance and protect your design.
6. Negative Space Designs With Nail Art Brush

Negative space nail art embraces minimalism by leaving portions of the nail unpainted. This technique creates striking designs through contrast and simplicity. Clean lines are essential for effective negative space looks, achievable using thin nail art brushes or striping tape.
Popular negative space designs include:
- Geometric shapes (triangles, circles, grids)
- Half-moon manicures
- Abstract design patterns
- Outlined designs
For beginners, simple shapes work well. Try painting half the nail, leaving a diagonal bare section. An advanced nail artist can experiment with intricate patterns or combine multiple techniques. Colour choices play a crucial role, with bold hues against natural nail beds creating eye-catching contrasts.
7. Holographic Nails

Holographic nails bring a futuristic shine to any manicure, creating a mesmerising effect that shifts and shimmers as it catches the light. To achieve holographic nails, there are two main methods: holographic polish and holographic powder.
Holographic polish is the simplest option, applied like regular nail polish. Holographic powder offers more versatility, brushed onto nearly-dry nails and sealed with a top coat. For a subtler look, try a holographic top coat over any colour.
Holographic nails work well for various occasions, from festivals and concerts to special events or everyday wear, for a touch of glamour. The effect pairs beautifully with both short and long nail shapes, particularly striking on almond or stiletto nails.
8. Polka Dot Perfection

Polka dot nail art offers a playful and versatile design option for any occasion. This timeless pattern can be adapted to suit various styles, from simple and elegant to bold and eye-catching. For a classic look, start with a solid base colour and add tiny dots using a contrasting shade.
To achieve precise dots, use a dotting tool or the rounded end of a bobby pin. Experiment with different small dot sizes and placements, such as gradient polka dots, where the dots gradually decrease in size. Matte finish polka dots offer a sophisticated touch while mixing polka dots with other nail art techniques can create more complex looks.
Nail Polish 101: Choose Your Perfect Shade
See our vast range of nail polish shades for your skin tone and style.
9. Ombré Nails

Ombré nails feature a seamless gradient of colours, creating a stunning visual effect. To achieve a flawless ombré look, start with a light base colour and gradually blend in darker shades using a makeup sponge.
Popular ombré combinations include:
- Nude to pink
- Pastel blue to navy
- White to glitter
For a twist on traditional ombré, try multi-coloured gradients, glitter ombré, or matte to glossy finishes. Ombré nails suit various nail shapes and lengths, working beautifully on coffin, almond, and square nails.
10. Striping Tape Art

Striping tape is a versatile tool for creating intricate nail designs. This thin, adhesive tape comes in various colours and widths, allowing for endless creative possibilities. To use striping tape, start with a base coat of polish and let it dry completely. Apply the tape in desired patterns, pressing down firmly to ensure clean lines.
For geometric designs, use multiple strips of tape to create shapes like triangles or chevrons. Paint over the exposed areas with contrasting colours. When removing the tape, pull it off slowly at a 45-degree angle to prevent smudging.
Experiment with different tape widths and combinations, trying crisscrossing patterns or mixing metallic colour and matte finishes for eye-catching effects. Remember to seal your design with a top coat for longevity.
11. Galaxy Nails

Galaxy nails offer a cosmic and mesmerising look for any occasion. This nail art design mimics the swirling patterns and vibrant colours of distant galaxies. To create galaxy nails, start with a dark base colour like black or navy blue. Use a makeup sponge to dab on lighter shades, such as purple, blue, and pink, in random patterns.
For added dimension, small dots of white polish are applied to represent stars. Finish the look with a layer of glitter polish or loose glitter for a shimmering effect. Galaxy nails work well on various nail shapes and lengths, particularly striking on longer nails or stiletto shapes.
This versatile nail art can be customised to suit different colour preferences, from cooler tones with blues and purples to warmer hues with pinks and oranges. For a subtle take on the trend, consider applying the galaxy design to just one or two accent nails.
12. Watercolor Effect

The watercolour effect creates a soft, dreamlike appearance on nails, mimicking the fluidity and blending of watercolour paints. To achieve this effect, nail artists use diluted nail polish or specialised watercolour nail products, applying small drops of different colours onto the nail and allowing them to blend naturally.
Pastel shades work particularly well for watercolour nails, creating a gentle and ethereal appearance. Popular colour combinations include soft pinks and lavenders, pale blues and greens, and muted yellows and peaches.
For a modern twist, some nail artists incorporate a matte finish over the watercolour design or create watercolour French tips. To protect the delicate design, a clear top coat is essential, sealing in the colours and adding shine to the finished look.
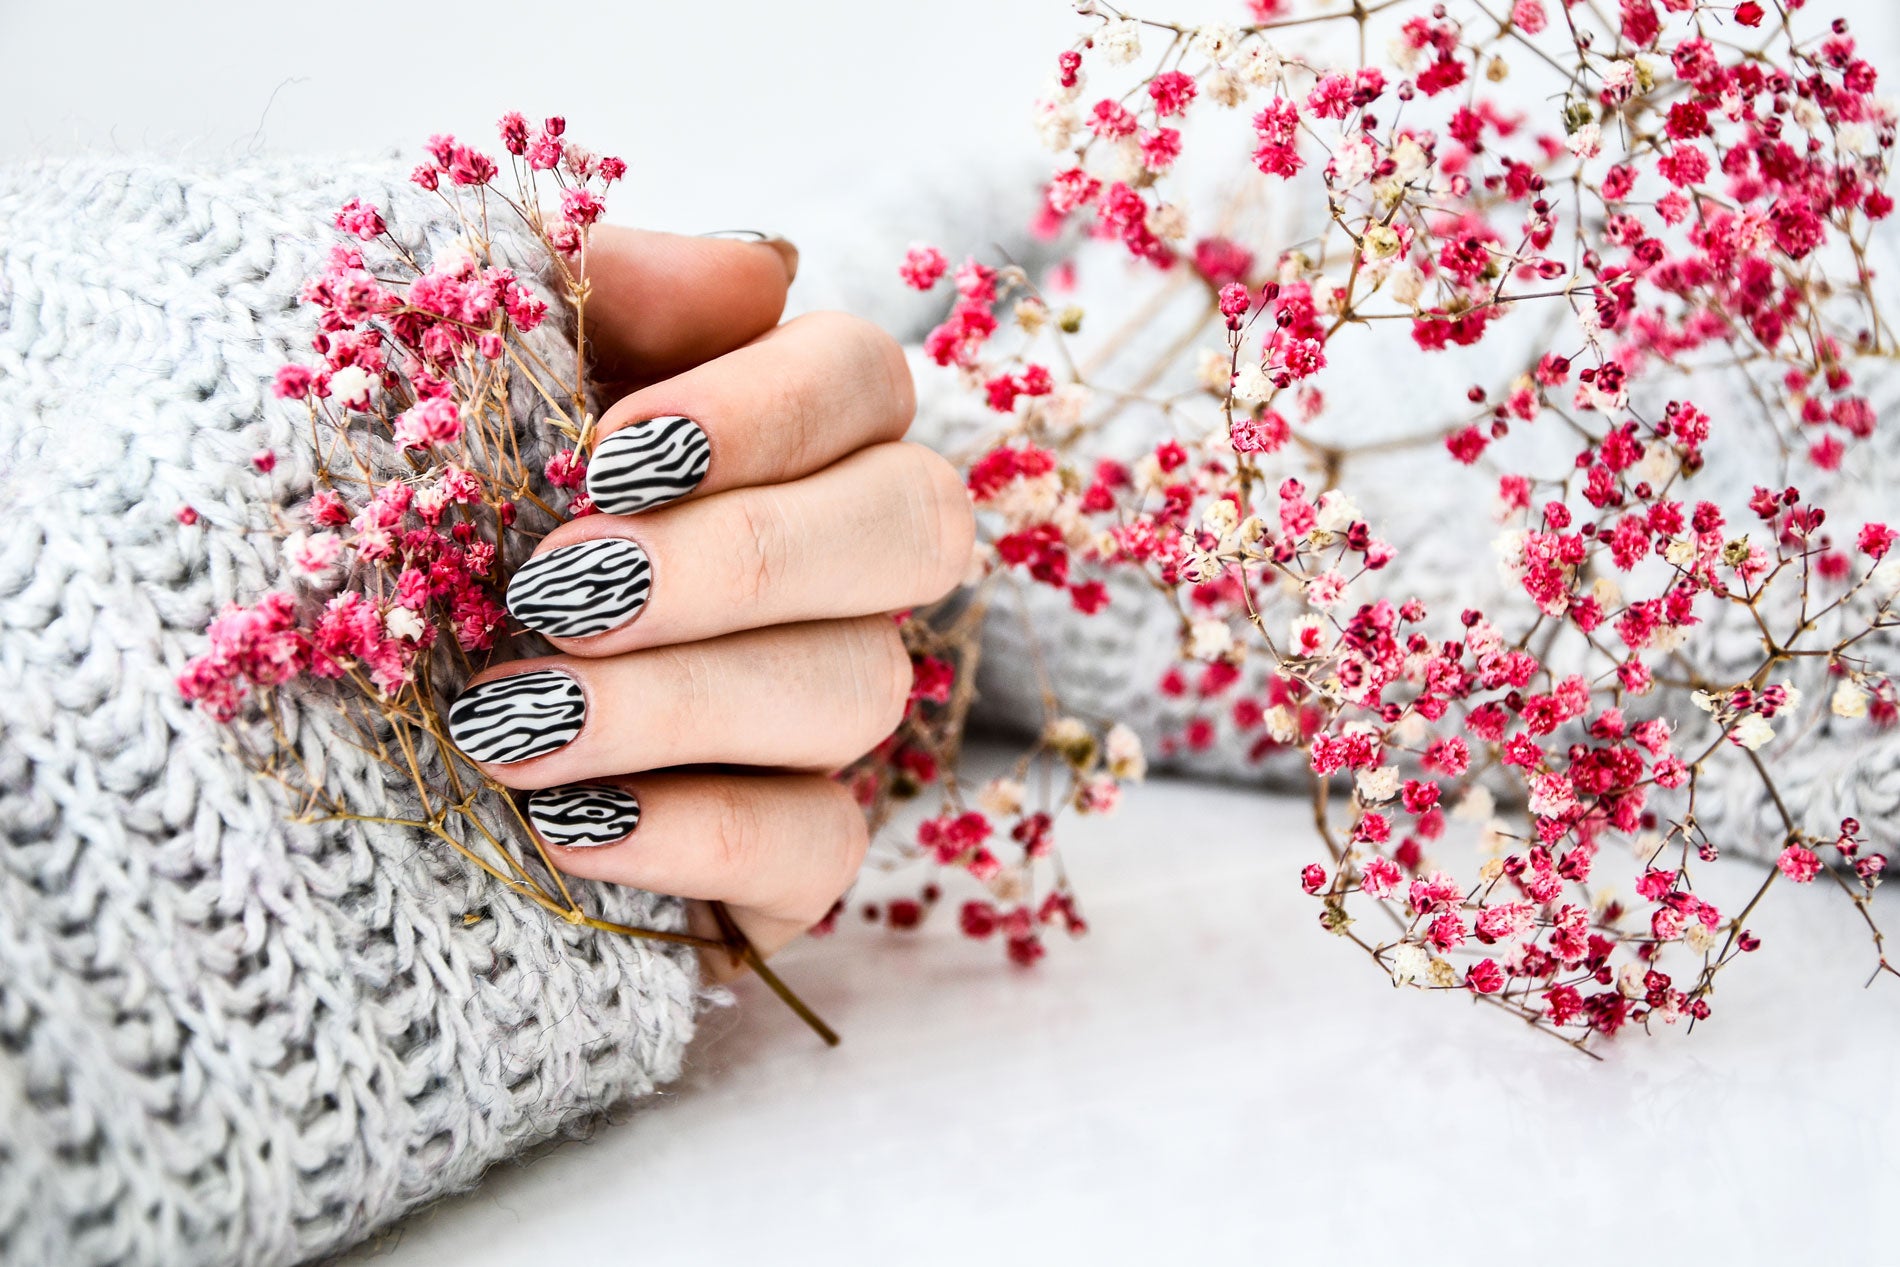
13. Animal Print

Animal print nail designs offer a wild and fierce look that can elevate any manicure. Popular animal print designs include leopard spots, zebra stripes, giraffe prints, and snake scales. Each pattern can be customised with different colour combinations to suit individual styles.
For beginners, try an accent nail with animal print while keeping others a solid colour. Experiment with colours to suit your style, using neon hues for a bold look or pastel tones for a softer approach. Remember to seal your animal print design with a top coat to ensure longevity and prevent chipping.
14. Metallic Accents

Metallic nail designs add a touch of glamour to any manicure. Chrome powders, metallic foils, and metallic nail polishes are popular choices for creating shimmering effects. These can be used for full coverage, accent nails, or intricate designs.
Creative ideas for metallic nail art include:
- Ombre effect using silver and gold
- Marble-inspired swirls with metallic polish
- Negative space designs incorporating metallic elements
- Metallic French tips in non-traditional colours
Metallic accents pair well with both bold and neutral colour schemes, making them versatile for different occasions and personal styles.
15. Pastel Swirls

Pastel swirl nail designs offer a soft and dreamy aesthetic that suits various styles and occasions. To achieve pastel swirls, start with a neutral base colour and use thin nail art brushes to apply swirling lines in complementary pastel shades.
Choose 3-4 pastel colours that harmonise well together, creating swooping curves and loops across the nail. For added elegance, consider incorporating tiny pearls, crystals, or metallic accents into the design.
These versatile designs suit a range of occasions, from casual everyday wear to weddings and special events, pairing particularly well with spring and summer outfits.
16. Neon Brights

Neon nail designs bring a bold, energetic flair to any manicure. Popular neon shades include highlighter yellow, electric green, and hot pink. These vibrant hues are perfect for making a statement and adding a pop of colour to any outfit.
To create easy neon nail designs:
- Start with a white base coat to make neon colours pop
- Apply thin layers of neon polish for even coverage
- Use a matte top coat for a modern twist
Gel nails are ideal for neon designs, as they provide a long-lasting, chip-resistant finish. For those new to neon, try incorporating it as an accent colour, pairing a single neon nail with neutral shades for a subtle yet stylish look.
17. Matte Finish

Matte nail polish offers a sophisticated, velvety texture that's become increasingly popular in nail art. This finish creates a non-reflective surface, giving nails a modern and understated look. Achieving a matte finish is simple by applying a matte top coat over regular polish or using specially formulated matte nail lacquers.
Matte finishes work well with various colours and designs, from solid colours to intricate patterns. Combining matte and glossy finishes can create striking contrasts, while matte nails paired with metallic accents offer a glamorous look.
18. Splatter Paint

Splatter paint nail art creates a vibrant, chaotic design that's both eye-catching and easy to achieve. This technique involves splattering nail polish onto the nails for a unique, artistic effect. To create splatter nails, start with a base coat and light-coloured polish, then use a small brush or straw to flick contrasting polish colours onto the nails.
Experiment with different tools and techniques to vary the splatter patterns, and clean up any excess polish on the skin with a small brush dipped in acetone. Finish with a top coat to seal and protect the design.
Upgrade Your Nail Tool Kit
Ensure you have the right tools for flawless nails. Explore essential nail tools every nail enthusiast should have in their arsenal.
19. Chevron Patterns
Chevron patterns add a touch of geometric elegance to nail art. These V-shaped designs create a bold, eye-catching look that suits various styles and occasions. To create perfect chevrons, nail artists often use tape as a guide or freehand the design with a thin brush.
Colour combinations play a crucial role in chevron designs. Try classic black and white, soft peach and cream, bold neon pink and electric blue, or luxe gold and navy. For added flair, incorporate glitter or metallic polish into chevron patterns.
20. Lace-Inspired Designs

Lace-inspired nail art brings a touch of elegance and femininity to any manicure. These intricate designs can be adapted for various nail shapes, including short nails, almond-shaped nails, and coffin nails. Lace patterns often feature delicate swirls, flowers, and geometric elements.
For short nails, a simple lace accent on a ring finger or index finger creates a sophisticated look. Almond-shaped nails provide an ideal canvas for more elaborate lace designs, such as a French tip with lace detailing along the edges. Coffin nails allow for bold lace statements, like a full lace overlay on a pale pink or white base.
Experiment with different colour combinations, such as white lace on the nude for a classic look or black lace on a deep red base for drama. Use a dotting tool to add tiny details and highlight specific areas, adding depth to the design.
21. Glitter Placement

Glitter placement is a nail art technique that allows for precise control over sparkly designs. It involves carefully positioning individual glitter particles to create stunning patterns and effects. To start, apply a base coat and let it dry completely. Then, use a thin brush or dotting tool dipped in nail glue to draw the desired pattern.
Common glitter placement designs include geometric shapes, floral patterns, starry night sky effects, ombré gradients, and abstract art. Experiment with different colours, sizes, and shapes of glitter to achieve unique effects. While it requires patience and a steady hand, the results are worth the effort.
22. Fruit-Inspired Art

Fruit-inspired nail art brings a refreshing splash of colour to any manicure. Popular fruits for nail art include strawberries, watermelons, lemons, cherries, and pineapples. For a simple design, start with a solid base colour and add small fruit accents.
Watermelon nails are particularly eye-catching. To create this look:
- Apply a pale pink base
- Paint a curved green tip
- Add black seeds using a dotting tool
For those seeking a bolder statement, consider a fruit-themed French manicure or use nail stickers and decals for a quicker application.
23. Gradient Dots

Gradient dots offer a playful and eye-catching nail design that's surprisingly easy to achieve. This technique creates a beautiful transition of colours using strategically placed dots.
To start, apply a base coat in the lightest shade of your chosen colour palette and wait for it to dry. Once dry, use a dotting tool to create rows of dots, starting with the second lightest shade near the tip of the nail. With each subsequent colour, place dots slightly lower on the nail, gradually decreasing the number of dots as you move towards the cuticle.
Vary the size of the dots for added dimension, using a larger dotting tool for bigger spots near the tip and a smaller one as you move down the nail. For a softer blend, gently drag a clean dotting tool through the wet polish to connect some of the dots.
24. Stained Glass Effect

Stained glass nails create a captivating, jewel-like appearance on the fingertips. To achieve this look, start with a black outline of geometric shapes on a clear base coat. Fill each section with different shades of sheer, coloured polish, building up the colour gradually for a translucent effect.
Key colours for crystal geode nails include deep blues and purples, soft pinks and lavenders, shimmering silvers and golds, and iridescent whites. For added dimension, incorporate pearl adornments or tiny gold flakes. Finish with a high-shine top coat to enhance the glossy, gem-like appearance.
25. Retro Patterns

Retro-inspired nail designs offer a fun way to embrace vintage aesthetics. These patterns draw inspiration from various decades, each with its unique style and flair. Some popular retro nail art ideas include:
- 1960s-inspired psychedelic swirls
- 1950s polka dots
- 1970s geometric patterns
- Pop art-inspired designs for a 1980s throwback
- 1990s color blocking
Mix and match these retro patterns for a truly unique look. Experiment with colour blocking for a 1990s throwback, using neon shades and metallic accents for extra punch.
26. Marble Swirls

Marble swirls bring a touch of sophistication to any manicure. This elegant nail art mimics the fluid patterns found in natural marble. To achieve marble swirls, nail artists use two main techniques: water marbling and freehand painting.
For water marbling, drop different nail polish colours onto a water surface and use a toothpick to swirl the colours together before dipping the nail. Freehand painting involves using thin brushes or dotting tools to paint swirling lines and veins directly onto the nail.
Popular colour combinations for marble swirls include classic white and grey, black and gold for a dramatic look, or pastel shades for a softer aesthetic.
27. Pressed Flower Nails

Pressed flower nails bring a touch of natural beauty to fingertips. To achieve this style, start with a base coat on clean, shaped nails. Select small, thin flowers or petals that have been properly dried and pressed. Carefully place them on the nail using tweezers and seal with a clear top coat.
This natural nail art is perfect for special occasions or as a refreshing everyday style. Mix and match different blooms for a garden-inspired look, or opt for a minimalist design with a single petal accent.
28. Iridescent Finish

Iridescent nail finishes create a mesmerising effect that shifts colours as light reflects off the surface. To achieve an iridescent finish, apply a specialised top coat over your base colour or use iridescent powder for more intense colour shifts.
Popular iridescent shades include opal white with rainbow reflections, soft pink with blue and purple shifts, and lavender with gold and green flashes. For a subtle effect, apply an iridescent top coat to just the tips or as an accent on one or two nails.
29. Reverse French Tip

The reverse French tip offers a fresh take on the classic French manicure. To create a reverse French tip, start with a base coat in a neutral shade. Use a thin brush to paint a curved line along the cuticle in your chosen accent colour. Popular choices include metallic shades, pastels, or bold neons.
For a more intricate look, try variations like an ombre effect, glitter accent, or negative space design. This versatile design works well with various nail shapes and lengths, particularly striking on almond or coffin-shaped nails.
30. Striped Ombré

Striped ombré nails combine two popular techniques to create a visually striking manicure. This style blends the gradual colour transition of ombré with crisp, clean stripes. Nail artists typically start with a base colour and gradually fade it into another shade, then add stripes using a thin brush or striping tape.
The orientation of the stripes can vary, with vertical stripes creating a lengthening effect, horizontal stripes adding width, and diagonal stripes offering a dynamic, modern appearance.
31. Confetti Nails

Confetti nails bring a festive touch to any manicure. To achieve confetti nails, start with a neutral base coat. Using various bright nail polishes, create small dots and irregular shapes across the nail surface. Vary the sizes and colours for a more realistic confetti appearance.
For added dimension, incorporate glitter polish or small nail art pieces. A clear top coat seals the design and adds shine. Confetti nails work well for special occasions like birthdays or New Year's Eve but can also brighten up everyday looks.
32. Minimalist Line Art

Minimalist line art offers a sleek and sophisticated approach to nail design. Start with a neutral base colour and use a fine-tipped brush or nail art pen to draw thin, precise lines. Popular minimalist line art designs include single vertical or horizontal lines, criss-cross patterns, triangles or squares, wave-like curves, and asymmetrical shapes.
Experiment with line thickness and spacing to create depth and visual interest. For added dimension, consider incorporating negative space into the design. Colour choices play a crucial role in minimalist line art, with black lines on a light base offering classic contrast and metallic lines adding a touch of glamour.
33. Foil Accents

Foil accents add a touch of glamour to any manicure. To apply foil, start with a base coat in a complementary colour. Brush on a thin layer of foil adhesive where you want the foil to stick, then press the foil onto the nail and gently peel away the backing.
Popular foil techniques include full coverage foil nails, foil tips, abstract foil shapes, and foil stripes or geometric designs. Negative space designs work brilliantly with foil, using tape to mask off sections of the nail before applying foil for clean lines and interesting shapes.
34. Stamping Art

Nail stamping art offers an easy way to create intricate designs at home. This technique uses special plates etched with patterns and a stamper to transfer designs onto nails. To begin, apply a base coat and let it dry completely. Choose a stamping plate with the desired pattern, apply polish to the design, and use a scraper card to remove excess polish.
Stamping plates come in countless designs, including geometric shapes, floral patterns, animal prints, and seasonal motifs. For best results, use polishes specifically made for stamping, which have a thicker consistency that transfers crisp, detailed designs.
35. Textured Polish

Textured polish adds a unique tactile element to nail art. Popular textures include sand, velvet, and matte finishes. Applying textured polish requires a slightly different technique than regular polish, using two coats and avoiding over-brushing.
For a simple look, apply textured polish to all nails. Or create accent nails by using texture on 1-2 nails only. Textured polish also works well for nail art designs like stripes or geometric shapes. To enhance dimension, layer different textured polishes.
36. Tie-Dye Inspired

Tie-dye nails bring a groovy, retro vibe to fingertips. To achieve tie-dye nails, start with a light base colour and choose three or four complementary shades for the tie-dye effect. Apply small dots or lines of each colour close together on the nail, then use a fine brush or toothpick to gently drag the colours together in swirling motions.
Experiment with different colour combinations, from bright rainbow hues to soft pastels or monochromatic schemes. Tie-dye nails work well on all nail lengths and shapes and can be applied to all nails or used as an accent on one or two fingers for a subtler look.
37. Mosaic Effect

Mosaic nails create a stunning pieced-together look reminiscent of intricate tile work. To create a mosaic effect, arrange small pieces of nail foil or nail art stickers in various colours on a neutral base coat. Seal with a clear top coat for a durable finish.
Experiment with different colour combinations, such as jewel tones, pastels, or classic black and white. Mosaic nails work well for special occasions or as statement art on accent fingers.
38. Velvet Nails

Velvet nails offer a luxurious and tactile manicure option. This unique nail art technique creates a soft, fuzzy texture that mimics the feel of velvet fabric. Manicurists use specialised magnetic polishes or flocking powder to achieve this effect.
Velvet nails work well with various colours, from deep jewel tones to pastels. For added dimension, combine velvet textures with smooth finishes or intricate designs.
39. Distressed Denim

Distressed denim nails bring a touch of edgy, casual coolness to any manicure. To create this effect, start with a base coat of light blue polish, then apply a slightly darker blue shade unevenly for a textured appearance. Use a thin brush or toothpick to add white streaks, mimicking the frayed threads of distressed denim.
Consider variations like adding metallic studs for a punk-inspired look, mixing in darker blue shades for a patchwork effect, or including subtle glitter for a touch of glamour.
40. Crystal Geode

Crystal geode nail art captures the mesmerising beauty of natural gemstones. Start with a dark base colour representing the outer layer of the geode, then use a small brush or sponge to apply layers of lighter shades, building up the crystalline effect. Add depth and dimension by incorporating metallic polishes or fine glitter.
Key colours for crystal geode nails include deep blues and purples, soft pinks and lavenders, shimmering silvers and golds, and iridescent whites. Finish with a high-shine top coat to enhance the glossy, gem-like appearance.
41. Sunset Gradient

Sunset gradient nails capture the mesmerising beauty of a fading day. Nail artists start with a light base colour, typically a soft pink or peach, then blend in warmer tones like orange, red, and purple towards the tips. The key to a flawless sunset gradient lies in the smooth transition between colours, often achieved using a makeup sponge.
For added dimension, some designs incorporate glitter or metallic accents. This versatile style suits both short and long nails and can be adapted to match individual preferences, from subtle pastels to bold, fiery hues.
42. Boho Patterns

Boho nail designs embrace a free-spirited aesthetic with natural elements and earthy tones. These patterns often feature intricate details inspired by nature and diverse cultures, including floral motifs, geometric shapes, dreamcatchers, feathers, and celestial elements.
Popular boho nail colours include earthy browns and greens, warm terracotta and rust, soft pastels, and deep jewel tones. Texture is essential in boho nail art, so consider adding matte topcoats, glitter accents, or 3D elements like studs or crystals.
43. Shattered Glass

Shattered glass nail art creates a striking, multidimensional effect that mimics broken mirror fragments. To create this look, start with a dark base colour and carefully place small, irregular shapes cut from holographic nail foil or cellophane onto the nail. Overlap the pieces slightly for a more realistic broken glass effect.
This technique works on natural nails, acrylics, or gel extensions and is versatile enough to suit various nail shapes and lengths. Shattered glass nails pair beautifully with accent nails in solid colours or simple designs.
44. Neon Signs

Neon sign-inspired nail art brings the vibrant glow of city lights to fingertips. Start with a dark base colour like black or navy blue, then use thin brushes or nail art pens to paint neon-coloured shapes and letters. Outline the neon elements with white or a lighter shade of the same colour to create a glowing effect.
Consider incorporating simple shapes or short words commonly seen in neon signs, such as hearts, stars, "Open," "Bar," or "24/7." Apply a glossy top coat to enhance the neon effect and make the colours appear even brighter.
45. Seasonal Nail Art

Seasonal nail art allo ws individuals to express their festive spirit through their fingertips. Each season brings its own colour palette and motifs:
- Autumn: Warm oranges, deep reds, and golden hues with leaf patterns or miniature pumpkins
- Winter: Snowflakes, icy blues, and sparkling silvers, often incorporating holiday themes
- Spring: Pastel colours and floral motifs, such as cherry blossoms or Easter-themed designs
- Summer: Bright, bold colours with tropical fruit patterns, beach scenes, or nautical stripes
Seasonal nail art can also reflect current weather patterns or outdoor activities, allowing for creative expression year-round.
Salon-Quality Nails at Home
Save time and money with these nail designs to achieve salon-worthy manicures in the comfort of your own home. Your perfect nails await at Diamond Nail Supplies!
Easy Nail Art Choices, Your Canvas
Nail art offers endless possibilities for self-expression. The designs presented here serve as a starting point for creativity. Experimenting with different techniques allows individuals to discover their preferred styles. Mixing and matching elements can lead to unique, personalised looks.
Practice is key to improving nail art skills. With time and patience, even beginners can achieve professional-looking results. Nail art is meant to be enjoyable, offering a chance to play with bright colours, patterns, and textures without a long-term commitment.
Embracing imperfections is part of the learning process. Each attempt brings new insights and improvements. The nail art community welcomes enthusiasts of all skill levels, and sharing designs and tips can inspire others and foster creativity.
Whether you prefer bold statements or subtle elegance, there's a nail art technique to suit every taste. Let your nails become your canvas, and enjoy the journey of self-discovery through this versatile form of artistic expression. With these simple nail art designs, you can create stunning looks without spending too much money on salon visits. DIY nail art is not only fun but also a great way to express your creativity and style.