20 Aura Nails Designs You Must Try In 2024

Trendy Aura Nail Manicure Ideas
Aura Nails has taken the manicure world by storm, captivating beauty enthusiasts with their ethereal manicure designs. This trend draws inspiration from the concept of energy fields and spiritual auras, translating them into stunning gradient effects on fingertips. Aura nails focus on creating a centre glow that radiates outwards, resulting in a unique and personalised look for each wearer that reflects their inner self.
The technique involves blending different shades to achieve a soft, diffused appearance that mimics the subtle shifts in colour associated with auras. From dreamy pastels to bold, vibrant hues, aura nails offer endless possibilities for self-expression through nail features. This versatile design can be customised to suit any occasion, mood or personal style, making it perfect for everything from everyday wear to a bachelorette party.
As the popularity of aura nails continues to grow, nail artists and enthusiasts alike are discovering innovative ways to incorporate this trend into their manicures. Whether you prefer a subtle, minimalist approach or a more daring, multi-coloured design, there's an aura nail style to suit every taste. Let's explore 20 captivating aura nail designs that are sure to inspire your next trip to the salon or DIY aura nail session.
The Basics of Aura Nail Art
Aura nails are a captivating trend in the world of nail art. This unique style creates a soft, glowing effect reminiscent of ethereal energy fields, avoiding harsh lines for a seamless blend. The key to achieving aura nails lies in blending colours seamlessly. Nail artists typically start with a light base colour and gradually build up layers of complementary hues.
One popular technique involves using a small brush or sponge to dab different shades around the edges of the nail. This creates a dreamy, diffused look that mimics the appearance of an aura.
Gel polish is often the preferred medium for aura nail designs. Its longer-lasting formula allows for easier blending and a more vibrant finish.
To create aura nails at home, you'll need:
- Base coat
- Light-coloured nail polish (often a neutral base)
- 2-3 complementary nail polish shades (including a second colour)
- Small brush or sponge
- Top coat
Aura manicures can be customised to suit individual preferences. Some opt for soft pastels, while others prefer bold, vibrant colour combinations like hot pink aura designs.
The versatility of aura nail art makes it suitable for various occasions, from everyday wear to special events. Its subtle yet eye-catching nature appeals to nail enthusiasts of all ages, adding a touch of elegance to any look.
Discover Your Perfect Aura
Dive into our stunning array of aura nail designs and find the perfect style to express your inner glow. From classic French tips to galaxy-inspired masterpieces, your dream manicure awaits!
20 Aura Nail Designs To Try
- Classic Aura French Tips
- Holographic Shimmery Aura Nails Ombre
- Pastel Rainbow Aura Nails
- Galaxy Aura Nails
- Neon Aura Accents
- Metallic Aura Swirls
- Aura Marble Nails
- Sunset Aura Gradient
- Amethyst Aura Nails
- Negative Space Aura Design
- Aura Butterfly Wings
- Iridescent Aura Clouds
- Aura Geode Nails
- Neon Aura Flames
- Aura Water Droplets
- Aura Aurora Borealis
- Glitter Aura Fade
- Aura Animal Print
- Aura Stained Glass
- Minimalist Aura Accents
1. Classic Aura French Tips

French tips have long been a staple in nail design. Now, they've received a magical upgrade with the aura trend. This fresh take adds a soft, ethereal glow to the classic look. The base of the nail typically features a nude shade. This creates a clean canvas for the aura effect. Nail artists then apply a white or light-coloured polish to the tips, blending it seamlessly into the base.
The aura element comes into play with a gentle gradient. Soft hues like baby pink, lavender, or pale blue are applied around the white tip. These colours fade subtly into the nude base, creating a dreamy halo effect that's super cute at first glance.
Application techniques vary, but many nail technicians use a small sponge or brush. They dab the aura colour around the tip, working quickly to blend it before the polish dries. Some opt for an airbrush tool for an even softer finish.
Popular colour combinations include:
- White tips with a pink aura
- Ivory tips with a peach glow
- Pearl tips with a lilac haze
This design works well on both natural and artificial nails. It's versatile enough for everyday wear but can also be dressed up for special occasions, adding a touch of fun to your look.
To maintain the look, a quality top coat is essential. It seals in the design and adds shine, making the aura effect truly pop.
2. Holographic Shimmery Aura Nails Ombre

Shimmery aura nails reach new heights with holographic aura ombre designs. This stunning effect creates a gradient that shifts and sparkles as it catches the light, adding incredible texture to your manicure.
- To achieve this look, start with a light base colour. White or pale pastels work well as they allow the holographic effect to shine through. Apply two coats for full coverage.
- Next, select a holographic polish in your desired shade. Blues and greens are popular choices for a cool, otherworldly vibe. For a bolder look, consider hot pink or neon hues.
- Using a small makeup sponge, dab the holographic polish onto the centre of each nail. Gradually blend outwards, creating a soft gradient effect. The intensity should be strongest in the middle and fade towards the edges.
- For added dimension, layer different holographic shades. Try combining a pale blue with a deeper green for a mystical forest-inspired look. Alternatively, blend hot pink and neon yellow for a vibrant, eye-catching design.
- Seal the design with a high-shine top coat to enhance the holographic effect and protect your artwork.
The result is a dazzling, multidimensional manicure that shifts and shimmers with every movement of the body.
3. Pastel Rainbow Aura Nails

Pastel rainbow aura nails bring a soft, dreamy aesthetic to fingertips. This design combines multiple gentle hues for a subtle yet eye-catching look that's perfect for those who worry about overly bold designs. The colour palette typically includes muted shades of pink, lavender, baby blue, mint green, and pale yellow. These soft tones create a soothing rainbow effect when blended together.
To achieve this look, nail artists start with a light base coat. They then use a sponge to dab and blend the pastel colours, creating a seamless transition between shades. The colours are applied in a gradient, radiating outwards from the centre of each nail.
For added dimension, some artists incorporate a touch of shimmer or iridescent polish. This enhances the ethereal quality of the design, giving nails a gentle glow reminiscent of amethyst aura nails.
The pastel rainbow aura style suits various nail shapes and lengths. It works particularly well on longer nails, allowing more space for the colour gradient to develop. This versatile design can be customised to suit individual preferences. Some may opt for cooler tones, while others might lean towards warmer hues. The intensity of the colours can also be adjusted for a more vibrant or subdued effect.
4. Galaxy Aura Nails

Galaxy aura nails transport the beauty of the cosmos to your fingertips. This stunning design combines the soft gradients of aura nails with the captivating allure of the night sky. To create galaxy aura nails, start with a dark base coat, typically black or deep navy blue. Blend in purples, blues, and pinks using a sponge to create a seamless gradient effect.
Add depth to the design by incorporating shimmering elements. Use fine glitters or metallic polishes in silver, gold, or iridescent hues to mimic twinkling stars and cosmic dust. This technique is similar to using eyeshadow to create a smoky eye effect but for your nails!
For a realistic touch, create small white dots using a thin brush or dotting tool to represent distant stars. Larger, more prominent dots can be added for a bold, stellar effect. To enhance the celestial theme, consider adding small moon or planet shapes. These can be created using nail stickers or hand-painted for a personalised touch.
Finish the look with a high-shine top coat to seal the design and add extra sparkle. This will also help protect the intricate details of your galaxy aura nails. Galaxy aura nails are perfect for those who love dramatic, eye-catching designs. They're ideal for special occasions or for anyone wanting to make a bold statement with their manicure. The result is truly gorgeous and out of this world!
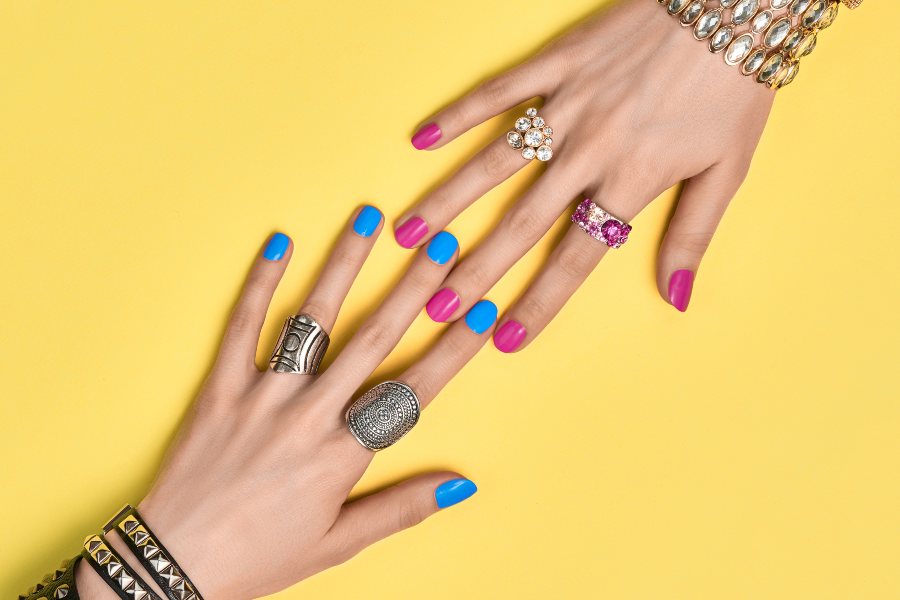
5. Neon Aura Accents

Neon colours add a vibrant twist to aura nail designs. These bold hues create eye-catching focal points that elevate the ethereal effect of aura nails.
For maximum impact, place neon accents at the centre of each nail. This creates a radiant glow that fades into softer tones towards the edges. Popular neon shades include electric blue, lime green, and hot pink.
Colour theory plays a crucial role in neon aura designs. Pairing complementary colours, such as neon orange with soft blue, creates a striking contrast. Alternatively, using analogous colours like neon yellow and lime green produces a harmonious gradient effect.
To incorporate neon accents:
- Apply a light base colour
- Use a small brush to add neon polish at the nail centre
- Blend outwards with a sponge
- Seal with a glossy top coat
For a subtle approach, try neon French tips or a single accent nail. These techniques add a pop of colour without overwhelming the overall design.
Experiment with different neon shades to find the perfect match for various skin tones. Cooler neons often suit fair skin, while warmer neons complement deeper skin tones.
6. Metallic Aura Swirls

Metallic aura swirls bring a touch of glamour to the popular aura nail trend. This eye-catching design combines the ethereal quality of aura nails with the bold shine of metallic polish.
The nail artist uses a specialised brush technique to create metallic aura swirls. They start with a light base colour and carefully blend metallic polishes to achieve a fluid, swirling effect. Chrome powders can also enhance the metallic sheen.
Popular colour combinations include:
- Silver and blue
- Gold and rose gold
- Copper and bronze
The hazy effect typical of aura nails is achieved by gently blending the edges of each swirl. This creates a soft, dreamlike appearance that's both elegant and eye-catching.
For added sparkle, some designs incorporate rhinestones or glitter accents. These elements can be placed strategically to highlight the swirls or create intricate patterns. Metallic aura swirls work well on both long and short nails. They're versatile enough for everyday wear but also make a statement for special occasions.
To maintain the shine, a high-quality top coat is essential. Regular touch-ups can help preserve the metallic finish and keep the swirls looking fresh.
7. Aura Marble Nails

Aura marble nails blend the ethereal glow of aura designs with elegant swirls of marble patterns. This sophisticated look creates a mesmerising effect on each nail.
To achieve this style, start with a light base colour like white or pale pink. Apply it evenly to all nails and let it dry completely.
Next, choose two or three complementary colours for the marble effect. Popular combinations include:
- Lavender, baby blue, and silver
- Rose gold, peach, and white
- Emerald, teal, and gold
Fill a small container with room-temperature water. Drop small amounts of nail polish onto the water's surface, allowing the colours to spread naturally.
Using a toothpick or thin brush, gently swirl the colours together to create a marbled pattern. Dip the nail into the water at a 45-degree angle, then lift it out slowly.
Clean up any excess polish around the nail with acetone. Repeat the process for each nail, varying the patterns for a unique look on every finger.
Once dry, apply a clear top coat to seal the design and add shine. This will also help protect the intricate patterns from chipping.
8. Sunset Aura Gradient

Sunset aura nails capture the mesmerising hues of twilight on your fingertips. This design blends warm oranges, pinks, and purples to create a stunning gradient effect.
To achieve this look, start with a light orange base coat. Using a small sponge, dab on layers of pink and purple polish, blending them gently towards the tips. The colours should transition smoothly, mimicking the gradual changes in a sunset sky.
For added depth, incorporate touches of gold or yellow near the cuticle area. This simulates the sun's last rays and adds a warm glow to the overall design.
Experiment with different colour intensities to create varied effects. Lighter shades result in a soft, pastel sunset, while deeper tones produce a more dramatic look.
To enhance the ethereal quality of sunset aura nails, consider adding a fine shimmer topcoat. This creates a subtle sparkle reminiscent of twinkling stars appearing as night falls.
For best results, seal the design with a high-gloss topcoat. This not only protects the artwork but also gives the nails a glossy finish that catches the light beautifully.
9. Amethyst Aura Nails

Aura crystal nails bring the mesmerising beauty of gemstones to fingertips. This design incorporates shimmering, multifaceted effects reminiscent of precious stones. To achieve this look, start with a clear base coat. Apply a light, iridescent polish as the foundation. This creates a luminous backdrop for the crystal effect.
Next, use a small brush or sponge to dab on patches of complementary colours. Popular choices include:
- Amethyst: Purple and lavender
- Citrine: Golden yellow and amber
- Rose quartz: Soft pink and peach
Blend the colours gently, allowing them to merge and create a subtle gradient. This mimics the natural variations found in crystals. For added sparkle, dust a fine holographic powder over the wet polish. This creates a multidimensional shine that catches the light from every angle.
To enhance the crystal-like appearance, consider adding geometric shapes. Use thin striping tape to create faceted patterns before applying the final top coat. Finish with a high-gloss top coat to seal the design and amplify the gemstone-inspired brilliance. The result is a set of nails that shimmer and shift like real crystals, adding a touch of mystical allure to any look.
10. Negative Space Aura Design

Negative space aura nails offer a chic, minimalist twist on the ethereal trend. This design incorporates bare nail areas to create striking contrasts with the aura effect. To achieve this look, start with a clear base coat. Apply striping tape to section off areas of the nail that will remain unpolished.
Create the aura effect using a small makeup sponge. Dab shades of pink, white, and soft blush tones around the edges of the nail, blending them gently. The centre should remain the lightest, mimicking a glowing aura.
Carefully remove the tape to reveal clean lines and bare nail sections. This technique works beautifully with rounded or almond-shaped nails. For a romantic touch, add a subtle shimmer to the aura blend. This creates a 'blushing bride' effect, perfect for weddings or date nights.
Experiment with different negative space patterns:
- Diagonal splits
- Vertical stripes
- Half-moon designs
- Geometric shapes
Pair this style with dainty jewellery for an elegant, understated look. The combination of bare nails and soft aura tones exudes a sophisticated charm. Remember to seal the design with a top coat to ensure longevity and a glossy finish.
Embrace the Aura Trend
From subtle pastels to bold aura gel polishes, we hope you’re getting some inspo’ for your aura vibes!
11. Aura Butterfly Wings

Aura butterfly wings nail designs combine delicate patterns with ethereal colour blending. This enchanting look transforms fingertips into miniature works of art.
To create this effect, start with a light base colour. Soft pastels like pale pink or lavender work beautifully.
Next, use thin brushes to paint delicate wing outlines. Curved lines and gentle swirls mimic a butterfly's intricate patterns.
The aura effect comes from carefully blending colours within the wing shapes. Use a small sponge or brush to apply gradients of complementary hues.
Consider these colour combinations:
- Lavender fading to sky blue
- Pale pink transitioning to peach
- Mint green blending into soft yellow
For added sparkle, incorporate fine glitter or shimmery polish in strategic spots. This catches the light, enhancing the magical aura effect.
Seal the design with a clear top coat. This protects the intricate artwork and adds a glossy finish.
Aura butterfly wings suit various nail shapes and lengths. They're particularly striking on almond or oval nails, which echo a butterfly's graceful form.
12. Iridescent Aura Clouds

Iridescent aura clouds bring a dreamy, sky-inspired look to nail art. This design captures the ethereal beauty of clouds with a shimmering, multi-coloured finish.
To create this effect, start with a pale blue or white base coat. Once dry, use a makeup sponge to dab on swirls of pastel colours like lavender, mint, and peach.
Blend the colours gently to create a soft, cloud-like appearance. The key is to keep the edges diffused and overlapping for a natural look.
Next, apply a thin layer of iridescent top coat. This adds a magical, colour-shifting glow to the design. For extra sparkle, dust on some fine holographic glitter.
Finish with a glossy top coat to seal the design and enhance the iridescent effect. The result is a set of nails that shimmer and change colour as they catch the light.
This versatile design works well on all nail shapes and lengths. It's perfect for those who want a subtle yet eye-catching manicure that reflects the beauty of the sky.
13. Aura Geode Nails

Aura geode nails combine the ethereal beauty of aura nails with the crystalline allure of geodes. This stunning design mimics the natural layers and formations found in these captivating rocks.
To create aura geode nails, start with a dark base colour like navy blue or deep purple. This serves as the outer "shell" of the geode.
Next, apply lighter shades in thin, irregular layers to mimic the geode's interior. Use colours like pale blue, lavender, and white. Blend these shades gently to create a soft, glowing effect.
For added sparkle, incorporate fine glitter or shimmering polish in complementary hues. This step enhances the crystalline appearance of the design.
To achieve a more realistic look, use a thin brush to add delicate lines and details. These represent the intricate patterns found in natural geodes.
Finally, seal the design with a glossy top coat. This not only protects the artwork but also gives it a polished, gem-like finish.
Aura geode nails are perfect for special occasions or when you want to make a bold statement. They're a unique way to showcase your creativity and love for natural beauty.
14. Neon Aura Flames

Neon aura flames bring a fiery edge to nail art. This eye-catching design combines the ethereal glow of aura nails with the bold impact of neon colours.
To create neon aura flames, start with a dark base coat. Black or deep navy works well to make the flames pop. Next, use a thin brush to paint flame shapes in vibrant neon shades.
Popular colour combinations include:
- Neon pink and orange
- Electric blue and green
- Yellow and red
For an authentic flame effect, blend the colours gently where they meet. Use a small sponge or brush to create a subtle gradient within each flame.
The key to neon aura flames is the glow effect. Achieve this by adding a thin line of white or pale yellow along the edges of each flame. This creates the illusion of light emanating from the design.
For extra flair, consider adding rhinestones or glitter to mimic sparks. Place these strategically at the tips of the flames or scattered across the nail.
Neon aura flames work best on longer nails, as they provide more space for the design. However, a simplified version can be adapted for shorter nails by focusing on one or two flames per nail.
This bold look is perfect for summer parties or festivals. It's a surefire way to make a statement and turn heads with your manicure.
15. Aura Water Droplets

Aura water droplets bring a mesmerising, three-dimensional effect to nail art. This design combines the ethereal beauty of aura nails with the illusion of water droplets, creating a captivating and unique manicure.
To achieve this look, start with a smooth base colour that complements the chosen aura shades. Apply the base colour evenly and allow it to dry completely.
Next, create the aura effect using a gradient technique. Choose two or three complementary colours and blend them gently with a small sponge or brush. Focus the lighter shade in the centre of each nail, gradually blending outwards with darker hues.
Once the aura background is set, it's time to add the water droplet illusion. Use a clear gel polish to create small, raised dots on the nail surface. Vary the size and placement of the dots for a natural look.
Before curing the gel droplets, gently tap the centre of each dot with a dotting tool. This creates a slight indentation, enhancing the realistic appearance of water droplets.
Cure the gel droplets under a UV or LED lamp according to the manufacturer's instructions. Finally, a high-shine top coat is applied to seal the design and add extra depth to the water droplet effect.
This eye-catching design combines the dreamy quality of aura nails with a touch of realism, resulting in a truly captivating manicure.
16. Aura Aurora Borealis

Aura Aurora Borealis nails capture the mesmerising beauty of the Northern Lights at your fingertips. This ethereal design combines vibrant greens, blues, and purples in a seamless blend that mimics the celestial display.
To achieve this look, start with a dark base coat, preferably black or deep navy. This provides the perfect backdrop for the aurora colours to shine.
Next, use a sponge to apply the aurora hues in a wavy pattern:
- Emerald green
- Electric blue
- Deep Purple
- Soft pink
Blend the colours gently, allowing them to merge and create a gradient effect. The key is to keep the transitions smooth and natural-looking.
Add a touch of shimmer using a fine glitter polish or loose cosmetic-grade glitter. This creates the illusion of twinkling stars in the night sky.
Finish with a high-shine top coat to seal the design and enhance the otherworldly glow. The result is a stunning manicure that looks like you've captured the aurora borealis on your nails.
For added drama, consider incorporating gold or silver accents to represent stars or constellations. This nail art is perfect for those who want to make a bold statement or embrace their love of nature's most spectacular light show.
17. Glitter Aura Fade

Glitter Aura Fade nails combine the ethereal glow of aura designs with the sparkle of glitter for a truly mesmerising effect. This technique creates a gradient that transitions from a soft, diffused aura to a dazzling glitter-packed finish.
To achieve this look, nail artists start with a light base colour as the foundation. They then use an airbrush or sponge to apply the aura effect, blending two or more complementary hues for a subtle gradient.
The glitter comes into play at the tips or edges of the nails. Nail technicians carefully apply a fine-grained glitter polish, gradually increasing its density towards the free edge. This creates a fade effect from the aura into the glitter.
Some popular colour combinations for Glitter Aura Fade nails include:
- Soft pink aura fading into rose gold glitter
- Lavender aura transitioning to silver sparkles
- Sky blue aura blending into iridescent glitter
For added dimension, artists may incorporate larger glitter flakes or holographic particles. These catch the light and create depth within the design.
To ensure longevity, a high-quality top coat is essential. It seals in the design and adds shine, making the Glitter Aura Fade truly pop.
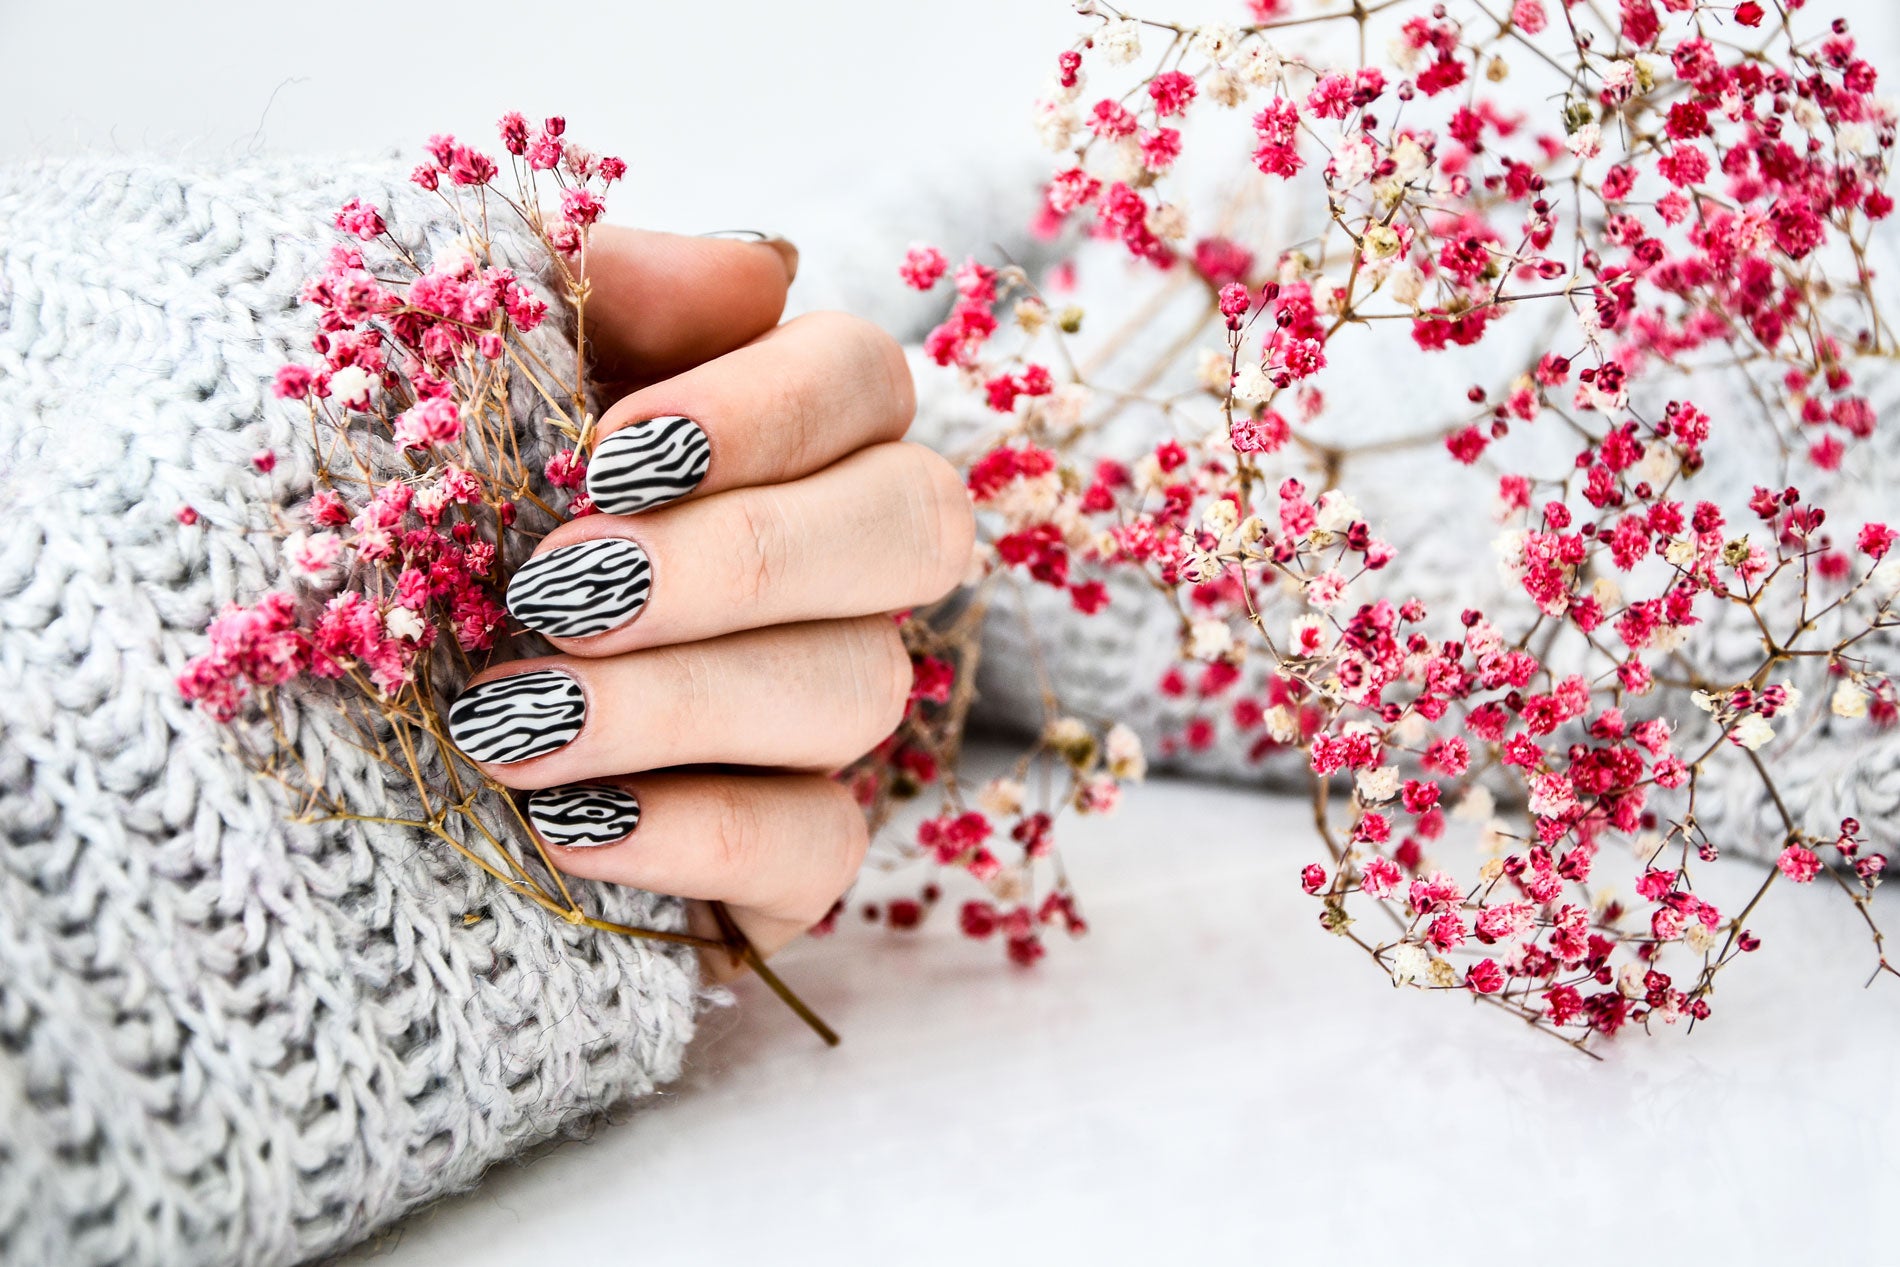
18. Aura Animal Print

Aura animal print nails combine wild patterns with an ethereal twist. This eye-catching design merges the boldness of animal prints with the soft, ethereal glow of aura nails.
To create this look, nail artists use stencils to apply animal print patterns. Leopard spots, zebra stripes, or snake scales work well. The key is to choose a base colour that complements the aura effect.
For a classic look, try a beige base with dark brown leopard spots. Apply the aura effect around each spot using a soft pink or lavender. This creates a magical, glowing appearance.
Zebra prints offer a striking contrast. Use a white base with black stripes, then add a blue or purple aura around each stripe. The result is a mesmerising, almost 3D effect.
Colour combinations play a crucial role in aura animal print nails. Bold choices like neon green with black tiger stripes and a yellow aura create a vibrant, tropical vibe.
For a subtler approach, opt for a grey base with white snow leopard spots. Add a soft blue or silver aura for a wintery, mystical feel.
This design works well on all nail shapes. However, longer nails provide more space to showcase the intricate patterns and aura effects.
19. Aura Stained Glass

Aura stained glass nails combine the ethereal beauty of aura designs with the intricate patterns of stained glass. This stunning technique creates a translucent, jewel-toned effect on the nails that catches the light beautifully.
To achieve this look, nail artists start by applying a sheer base coat. They then outline geometric shapes using thin black lines, mimicking the lead that came in traditional stained glass.
Next, the spaces between the lines are filled with translucent aura-inspired colours. These can range from soft pastels to bold jewel tones, depending on the desired effect.
The key to successful aura stained glass nails lies in the blending technique. Artists use a small brush or sponge to gently blend the colours, creating a soft gradient within each "pane" of the design.
A glossy top coat is applied to seal the design and enhance the glass-like appearance. This final step adds depth and dimension to the overall look.
Aura-stained glass nails are perfect for special occasions or as a unique statement piece. They work well on longer nails, providing more space for intricate designs, but can be adapted for shorter nails too.
This technique allows for endless creativity. Popular designs include:
- Floral patterns
- Geometric shapes
- Abstract swirls
- Celestial motifs
Aura-stained glass nails require patience and precision, but the results are truly mesmerising.
20. Minimalist Aura Accents

Minimalist aura nails offer a sophisticated twist on the trend. They incorporate subtle touches of ethereal glow without overwhelming the overall design.
One approach is to add a small aura effect at the base of each nail. This creates a gentle gradient that fades into the natural nail colour. Soft pastels like pale pink or lavender work beautifully for this technique.
Another option is to place tiny aura accents at the tips of the nails. This inverted style gives a fresh, modern look. Cool-toned hues such as icy blue or mint green are excellent choices for this variation.
For those who prefer even more subtlety, a single accent nail with an aura effect can make a statement. The remaining nails can be painted in a complementary solid colour or left bare for a truly minimalist aesthetic.
Delicate embellishments can enhance minimalist aura designs. Tiny rhinestones placed strategically along the aura's edge add a touch of sparkle. Silver stars, when used sparingly, create a celestial-inspired look that complements the ethereal nature of aura nails.
To achieve a clean, precise aura effect, nail artists often use a fine brush or sponge. They carefully blend the colours to create a seamless transition. A glossy top coat helps to seal the design and enhance its luminous quality.
Find Your Signature Glow
Whether you prefer minimalist accents or bold statements, we hope our aura nail guide has the perfect design for you.
Explore now our full range here and discover how to infuse your manicure with ethereal charm!
Elevate Your Nail Game with Aura Designs
Aura nails offer a captivating blend of ethereal colours and mesmerising gradients. These designs transform fingertips into miniature works of art, allowing for endless creativity and self-expression. With options ranging from soft pastels to bold hues, aura nails suit any occasion or personal style. The subtle colour transitions catch the light beautifully, adding an enchanting touch to one's overall look.
Trying aura nails is straightforward. Start with a light base colour and gradually blend in complementary shades. Experiment with different colour combinations to find the perfect match for your mood or outfit. For best results, use high-quality nail polishes and take your time with the application. Clean brushes between colours to maintain crisp transitions. A shimmering top coat can enhance the ethereal effect.
Aura nails are versatile enough for everyday wear or special events. They pair well with both casual and formal attire, making them a go-to choice for nail enthusiasts of all styles. By embracing aura nail designs, anyone can elevate their manicure game and showcase their unique personality through their fingertips.